Chocolate Covered Raspberries and Brandied Cherries
I don’t think these Chocolate Covered Raspberries and Brandied Cherries really need much introduction or explanation.
Download the Chocolate Covered Raspberry recipe file here.
Download the Chocolate Covered Brandied Cherry recipe file here.
∵ chocolate covered anything = anythingimproved
& ∃ chocolate + brandy = delicious to me, ∴ must be delicious to you
I’m just following the mathematical facts here, but it only stands to reason that
Brandy ^ Sugar ^ Cherries ^ Dark Chocolate = a match made in heaven
+
Sugar ^ Raspberries ^ Dark Chocolate = heavenly perfection
∴ Chocolate Covered Raspberries and Brandied Cherries = the purest expression of true love you could make for your valentine
Irrefutable proof; it’s that simple.
Let’s get to it!
You’ll need:
For the Brandied Cherries
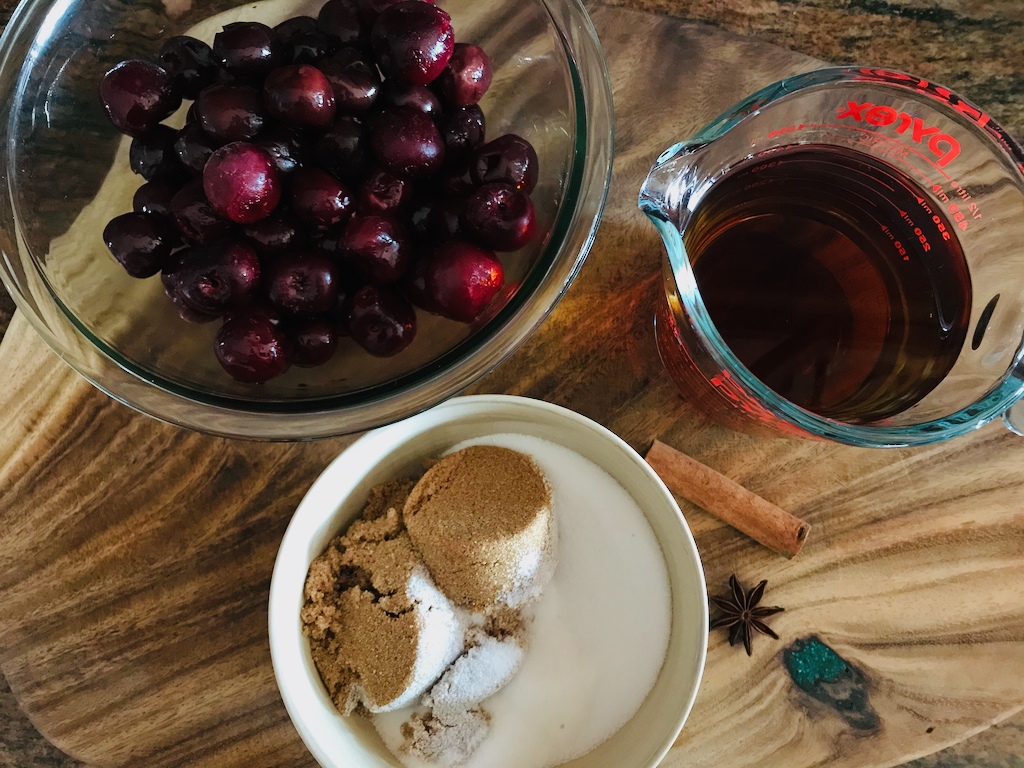
- ¾ cup granulated sugar
- ¾ cup brown sugar
- 2 cups brandy
- 1 lbs cherries (about 5 dozen)
- 1 cinnamon stick
- 1 star anise, whole
- 3 cloves, whole
For the Candy Coating
(this makes about 16 oz.)
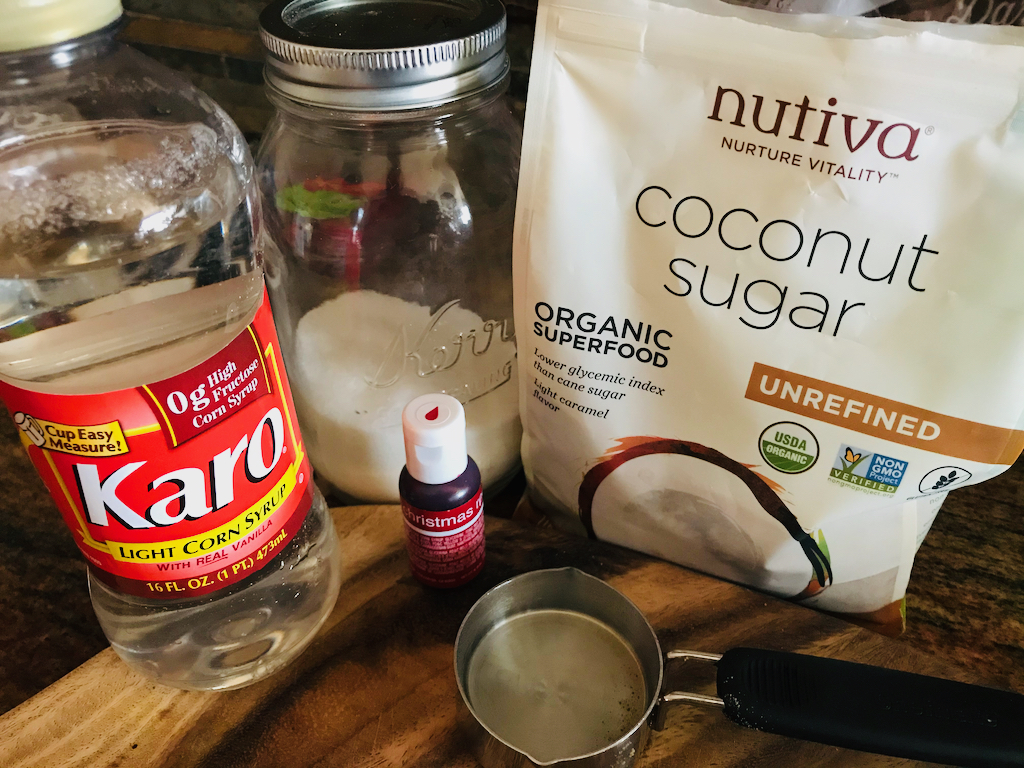
- ¼ cup water
- ¼ cup light corn syrup
- 1 cup coconut sugar*
- 1 cup granulated sugar
- 1-2 tsp brandy syrup, optional
- 1-2 drops red gel food coloring, optional
*If you don’t have coconut sugar, you can absolutely use all granulated sugar (2 cups), and your candy coating will actually melt a little more homogeneously and be slightly easier to get an even coating on your berries. I used half coconut sugar, because (a.) I have some in my pantry, (b.) I wanted to cut down on the plain, granulated cane sugar, and (c.) I like the slightly toasted taste that coconut sugar lends to candies and baked goods, and (d.) the candy coating doesn’t need to get to a fondant-like consistency; having a more fluid candy coating requires less resting or proving time for the centers to liquefy in the finished chocolates, and (e.) I think coconut sugar often lends a salty taste amidst the sweetness, for some reason, which I quite like.
Anyway! Here are some notes that will make more sense later: If you use all granulated sugar for the candy coating, it will most certainly work and work well. When re-melting the candy coating over a double boiler when you’re ready to coat the berries, it may take a minute or two longer to liquefy, it will be white in color and so a drop of food coloring gel will make a nice light pink color, which looks really nice (for all those people who look at their candy when they’ve bitten into it I’m one of those!), and it will make a thicker liquid candy layer in the finished chocolate, which means it will definitely take a full two days to liquefy in the centers, but giving them 4 days to liquefy in the centers is better.
Back to business.
For the Chocolate Coating
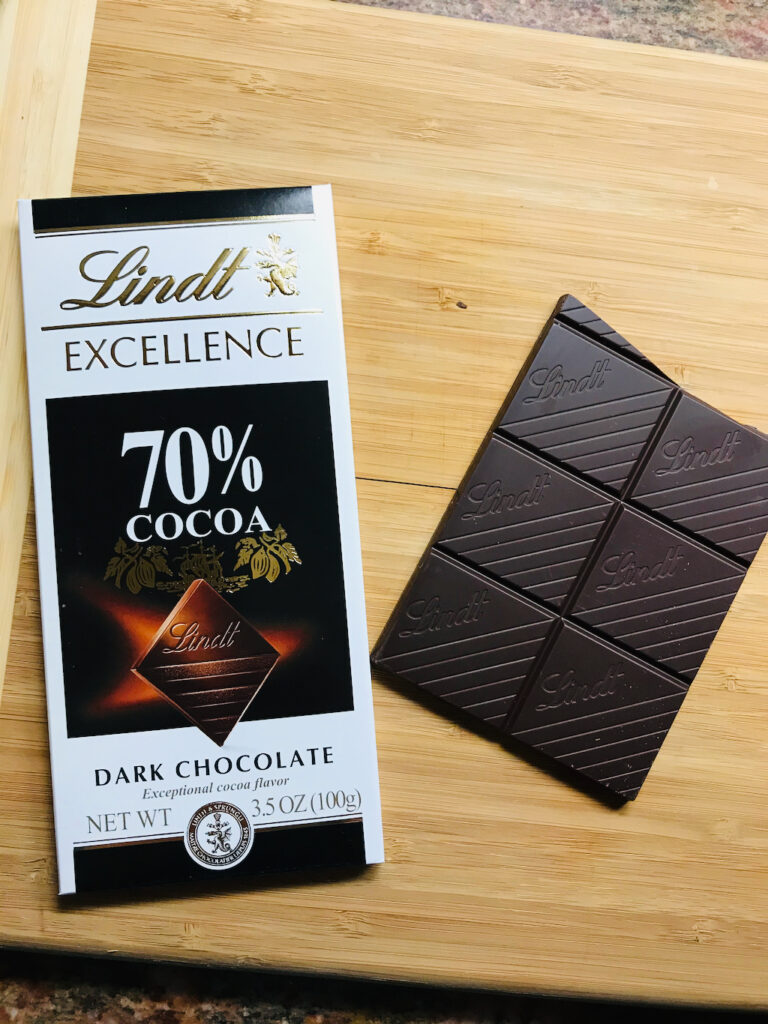
- 14 oz. (that’s 4, 3.5oz bars) of good quality dark chocolate**
**I really recommend using the Lindt Excellence 70% dark chocolate bars for home candy making, because they are already tempered and melt evenly and smoothly and stay melted for as long as you need to work with them. If you treat it right, and melt it slowly, that chocolate really is easy to work with… and tastes pretty darned good too.
For the Chocolate Covered Raspberries

- 5 dozen raspberries (about 2 punnets)
- 12 oz. candy coating (from above)
- 7 oz. dark chocolate**
For the Brandied Chocolate Covered Cherries
- 5 dozen brandied cherries (about 1 lbs., and see above for ingredients)
- 4 oz. candy coating (from above)
- 7 oz. dark chocolate**
Start by brandy-ing the cherries.
(This recipe was found on the YouTube channel by the Cocktail Dudes, fyi.)
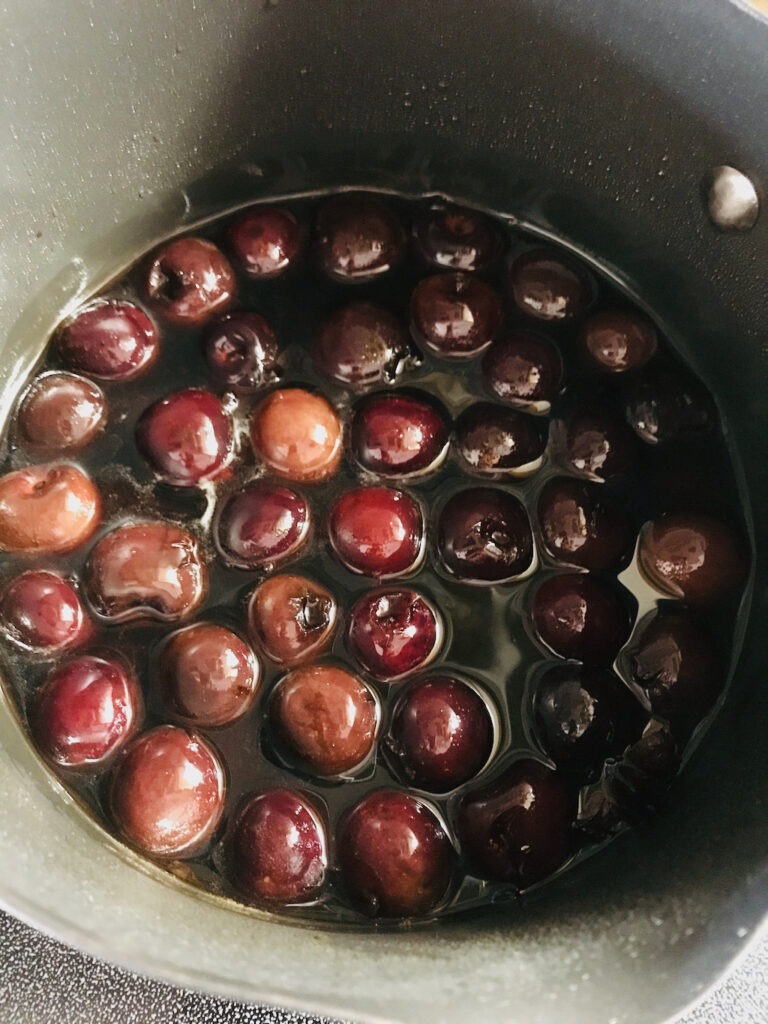
Measure out the ¾ cup granulated sugar, ¾ cup brown sugar and 2 cups brandy into a 4-quart saucepan. Heat over medium high and stir to dissolve the sugars. Bring to a simmer then add the cinnamon stick, whole star anise, and 3 whole cloves


Raise the heat to high and bring to a low boil, then add the 1 pound of cherries. Stir all of the cherries to coat each one. Bring the pot to a rolling boil, and then promptly turn off the heat.


Remove the pot from the heat and allow to sit at room temperature for 2 hours.
After 2 hours, remove the cherries with a slotted spoon, and go one of two directions from here:
If wanting to store the brandied cherries for a later date, spoon the cherries into glass jars, remove the spices as you come to them, then pour or spoon in enough of the brandy syrup to cover the cherries. Seal tightly with a lid and store in the refrigerator for up to 3 months.


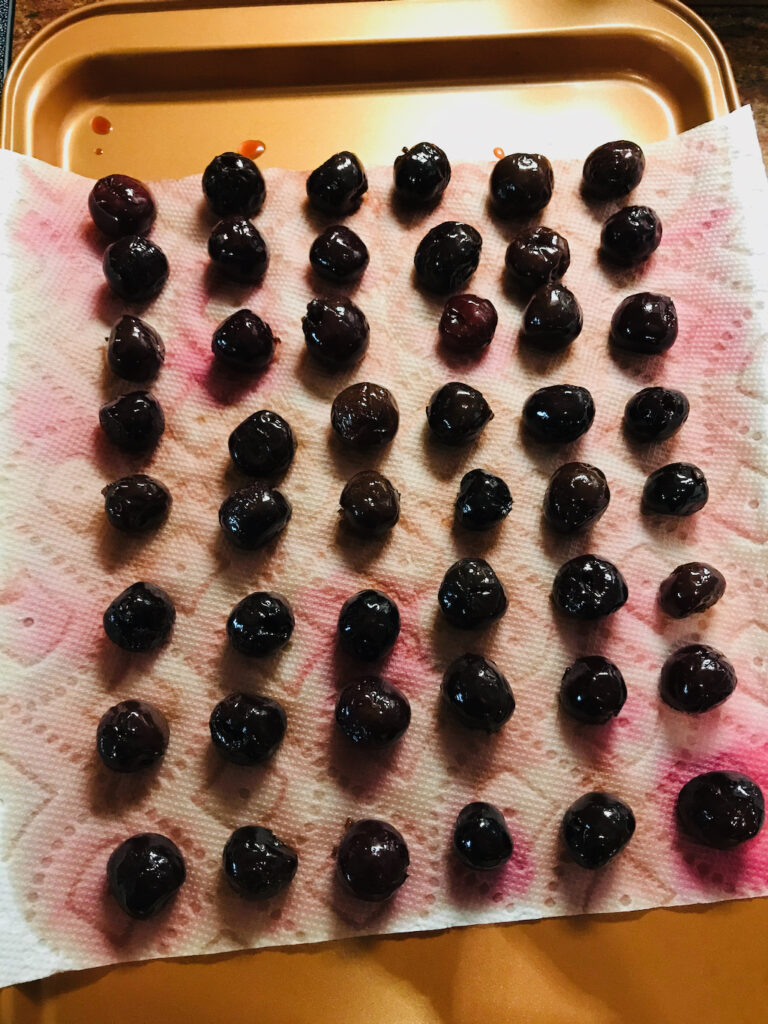
If wanting to go straight on with making chocolate covered brandied cherries, with a slotted spoon, remove from the pot the number of cherries you want to cover and space them evenly on a parchment- or paper-towel-lined baking sheet. Remove any spices as you come to them. Let those drained, separated cherries dry out in the refrigerator for at least 30 minutes or 2 hours if you can. (Store any additional/extra cherries as described above, covered in the liquid, sealed, and in the refrigerator.)

Next, make the candy coating.
Measure your 1 cup coconut sugar, 1 cup granulated sugar, ¼ cup light corn syrup and ¼ cup water into a 2 or 3 quart saucepan. Bring to a boil over medium-high heat. Before the mixture comes to a boil, stir the sugars to dissolve them and use a silicone spatula or a pastry brush to brush any sugar crystals from the sides of the pan. Once the syrup comes to a boil, no need to stir any more. Insert a candy thermometer and when the syrup reaches 238˚F (that’s just at the softball stage), pour the syrup into the bowl of a stand mixer (without scraping the sides of the saucepan), and don’t start the mixer yet: let the syrup cool to 112˚F. (This may take an hour.)
(I did not get any pictures of this step above, but it’s pretty straightforward: boil the sugar, brush down the sides, watch the temp.)
Once the syrup has reached 112˚F, add 1-2 tsp of the brandy syrup from the brandied cherries, optional and 1-2 drops of red gel food coloring, also optional. With the paddle attachment, start the mixer on medium-low and mix until the syrup reaches a thick, sticky, dough-like texture. (This generally takes me about 20 minutes.)


(If using 100% granulated sugar, the syrup should reach a fondant-like consistency and can be wrapped in plastic wrap and stored in the refrigerator until ready to use. If using 50/50 coconut and granulated sugar, like in the example in this blog post, the syrup will remain more fluid, and would be best stored in a glass jar until ready to use.)
Once mixed, I transferred the syrup straight into the top pot of a double boiler.


It’s nearly dipping time!
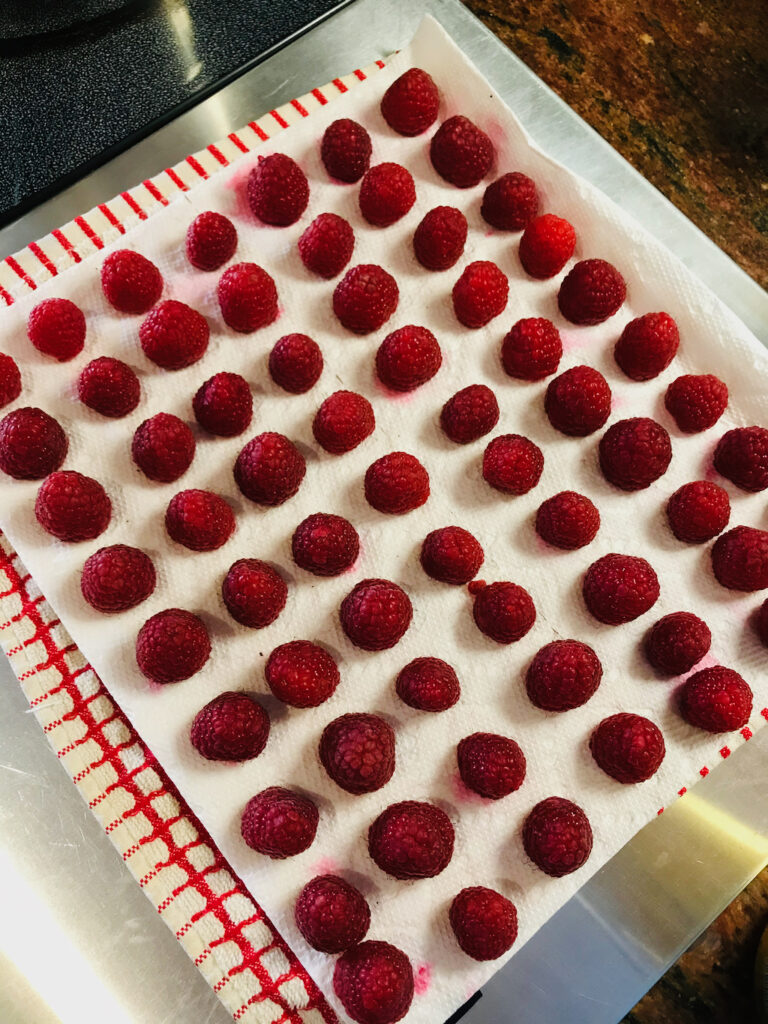
Rinse and gently pat dry all your raspberries and allow to dry, either at room temperature or in the refrigerator. (Tip: allowing the raspberries to dry spaced out on a cookie sheet in the refrigerator makes them ever so much slightly easier to coat with the sugar coating, as opposed to having them dry at room temperature.)
Once either set of your berries (cherries or raspberries) is dry-ish to the touch, they’re ready for coating! (I say dry-ish because the brandied cherries will not get all the way dry without a food dehydrator or a drying setting on your oven, but that dryness isn’t necessary to proceed. They work just fine being still tacky to the touch.

Place about 2 inches of water in the bottom pot of a double boiler (or use a pot and a bowl that rests atop, but not touching, a pot of water). Bring the bottom pot to a gentle simmer and melt the candy coating in the top pot. Either keep the heat on the lowest setting or turn it completely off, whichever will just maintain a dippable consistency to your coating.


The raspberries use more of the candy coating than do the cherries, so I start with candy-coating the raspberries.
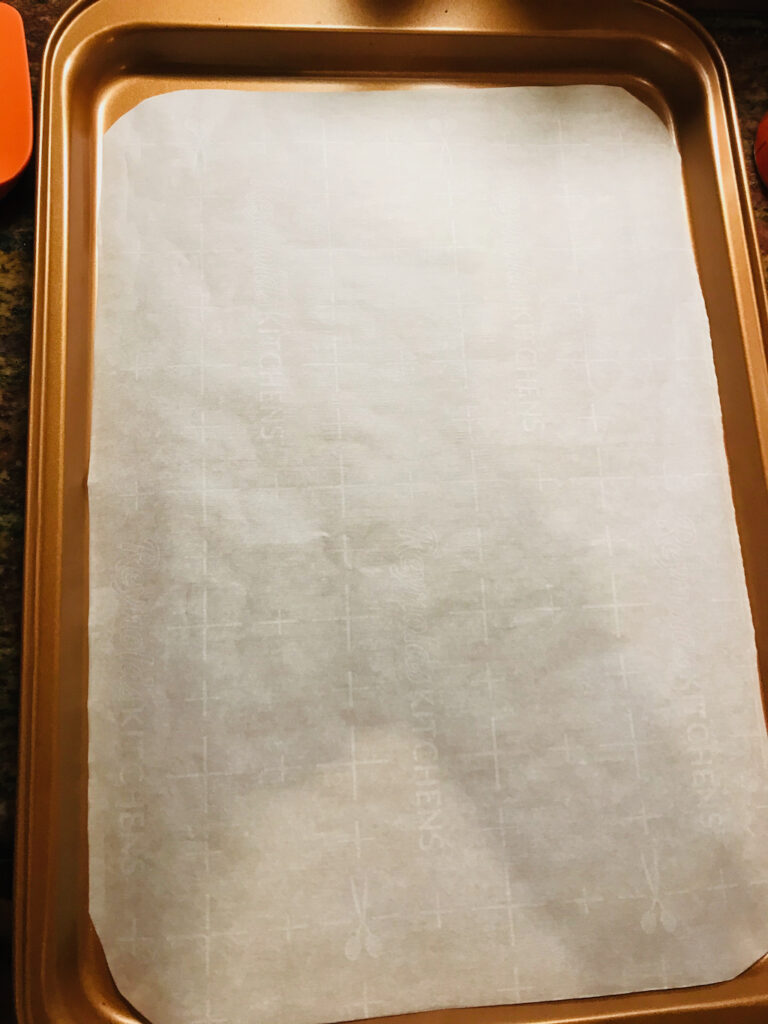
Line a large baking sheet with parchment paper.
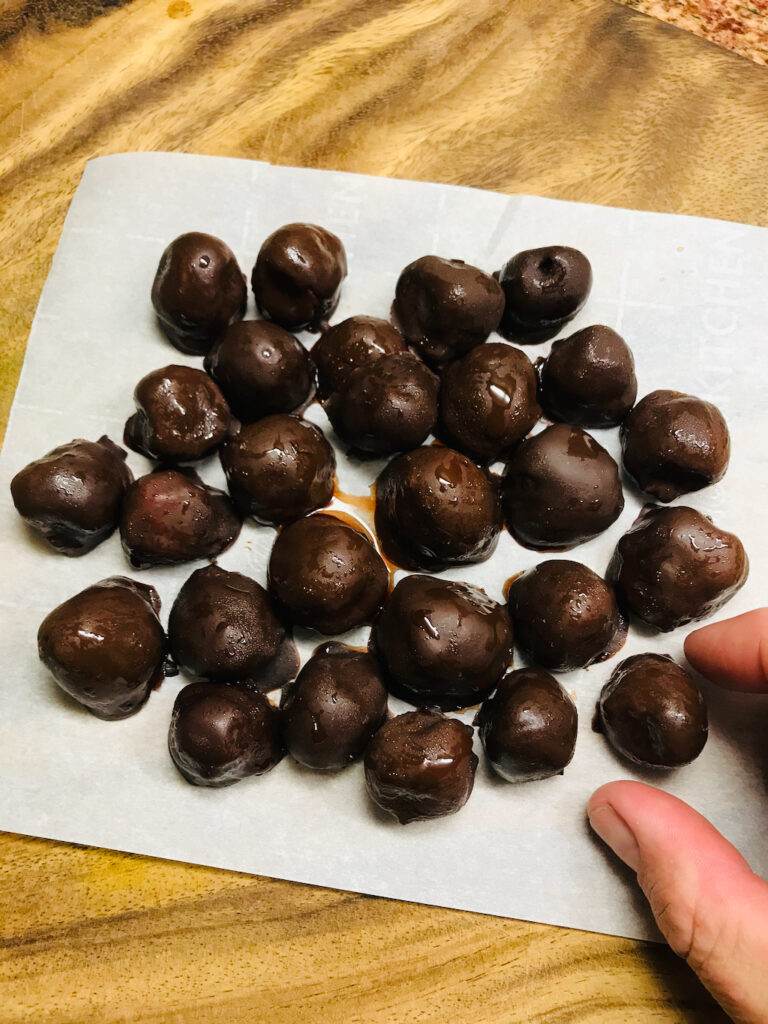
Working with 5 or 6 raspberries at a time turned out to be the right number for me to be able to manage well, place them in the pot of the candy coating and use a spoon to drizzle the coating over the tops. Once each is coated on all sides, use a pair of forks to lift each berry and scrape the drizzling drips from the bottom. Scrape each berry onto the parchment and do your best to space them apart.


Continue until all raspberries are candy coated. Allow to rest until the coating is set. This should take about 30 minutes. (This can be done either in the refrigerator or at room temperature.)
Next coat the cherries.
Line another large baking sheet with parchment paper.
The cherries, being thicker and sturdier than the raspberries, can be tossed into the pot of coating all together, or nearly all at once. Use a large silicone spatula to gently toss each cherry in the coating. Then use a pair of forks to fish them out, remove too much excess coating from the bottoms, and place them separated on the lined baking sheet.


Again, allow the coating to set for about 30 minutes.
In the meantime, chop your 4 dark chocolate bars.

I like to work with half the chocolate at a time, so place about half your chopped dark chocolate in a large heat resistant bowl that will sit above a pot of simmering water. (I like to use a bowl that sits atop a saucepot for melting and coating things with chocolate (as opposed to a double boiler) because the bottom of the bowl I use is broad and rounded, whereas my double boiler is flat and has a pesky ridge all around to seat the top pot snugly into the bottom, which always ends up wasting some chocolate, which is nearly a sin. I’m sure God would have included, thou shalt not waste chocolate in the ten commandments if He didn’t assume we already knew that one before Moses’s time.


Bring a pot with at least two inches water to a low simmer, and place your bowl of chopped chocolate atop it. Reduce the heat to low, or even turn off the heat, the chocolate will melt. Simply wait for the chocolate to melt most of the way, leaving a few chunks, then definitely turn off the heat and stir in the remaining few chunks of chocolate to melt all of it by the stirring.


I really like using Lindt Excellence 70% dark chocolate for candy coating because it’s so well tempered when you buy it, it stays just how it is when you melt it – IF you melt it slowly and low, and don’t cook it – so take your time, and this chocolate stays true. It melts shiny and silky, stays melted for as long as it takes you (me is what I really mean to say here) to fumble with coating berries, and then sets back up as snappy as before.
[There are Amazon Affiliate links in this blog post for this Lindt chocolate, and I do earn a percentage of the sale if you purchase any through my links provided, (that is if I don’t get kicked out of the program for lack of sales generated by a specific time frame that is coming up) However! The fact that this chocolate performs so well for me is completely true nonetheless, and I can personally attest to it’s ease of use and highly recommend using it for home candy making that involves chocolate coating.
I have used other fully-tempered dark chocolate bars (such as Chocolove’s 65% Rich Dark Chocolate, to name one) which is a really tasty eating dark chocolate as far as grocery-store finds go. It just doesn’t melt as smoothly and stay melted for as long for me to be able to work with it as does the Lindt 70%.
(Hatchez 55% Maracaibo is my all-time, hands-down, life-long-loyal, favorite eating chocolate, just so you know, because it’s important to know. But I cannot bring myself to cook with it or make anything out of it. It’s so truly perfect, that it must be simply eaten, savored and enjoyed. It’s like these jumbo blueberries that I come across every July. They’re just born perfect, and are not for cooking, they are for eating, period. Punkt, Schluß, Ende. You’ll notice there is no Amazon link to the Hachez Maracaibo chocolatein this post, and that’s for good reason. I prefer to buy it from a company called Chocosphere which is the most conscientious company I have ever found when it comes to shipping chocolate to any climate. Your chocolate always arrives to you as perfect as it left them. I have no affiliation with Chocosphere; I’m just a rabid fan.)


So, shall we discuss chocolate a little more, or get to chocolate enrobing. Let’s get back to chocolate coating!]
Line yet another baking sheet with parchment paper.
Start by dipping just the bottom third or half of each raspberry. I just use my hands. I’ve tried using toothpicks or oyster forks to grab the berry to dip it, but they just slip off and I end up using my hands anyway. Gently grab each berry, one at a time, and dip a good portion of the bottom in the melted chocolate. Just hold the berry for a second or two before placing it on the lined baking sheet.


And continue on until all the berry bottoms are dipped.
Then proceed to dipping the bottoms of the brandied cherries.


Move the trays to the refrigerator for about 10 minutes or so to allow the chocolate to set up.
Remove the bowl from the pot of water and refill the bottom pot if needed. Return the bottom pot to the stove and bring to a low simmer.
Place the remainder of your chopped chocolate into the same bowl you used before and place that bowl atop the pot of simmering water. Reduce the heat to the lowest setting and allow most of the chocolate to melt. When only a few chunks of chocolate remain unmelted, turn off the heat and stir the chocolate to melt completely.


Line yet another baking sheet with parchment paper.
I use two forks, a rubber spatula, and a pallet knife to coat the berries the rest of the way.
Do this one berry at a time:
Place a berry on a fork and use the rubber spatula to spoon and drape and drizzle a thick coating of chocolate all over the top, making sure to get a good drape over each side. Allow the excess to drip off, then use the second fork to transfer the berry to the parchment-lined baking sheet. Using a pallet knife (or a butter knife would work too) to help guide the berry from the fork to the parchment sheet is pretty helpful.


Repeat with all the berries.
Then repeat with all the cherries.


I like to let mine sit at room temperature for about half an hour before moving them to set in the refrigerator. (But waiting is not an issue, as it takes me at least that long to coat all of berries & cherries.)
Before placing them in the refrigerator, check all of them to make sure they have decent chocolate coverage. If you’ve got melted chocolate left, try using the forks and silicone spatula to drizzle a bit more over any bare or thin spots or gaps.


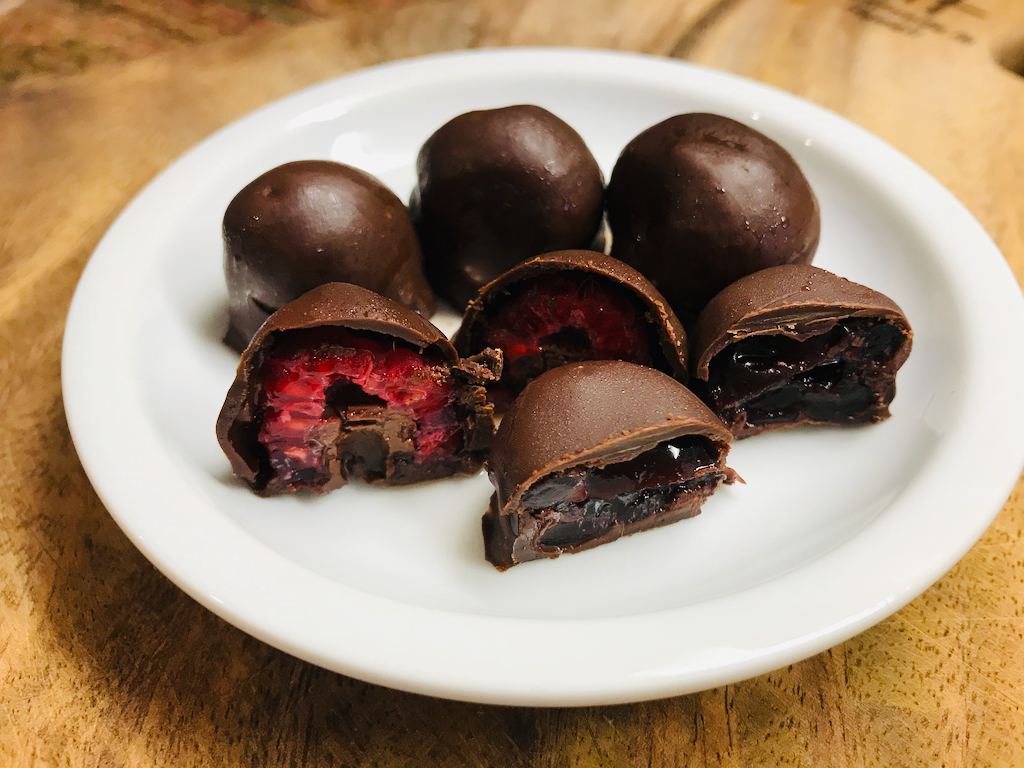
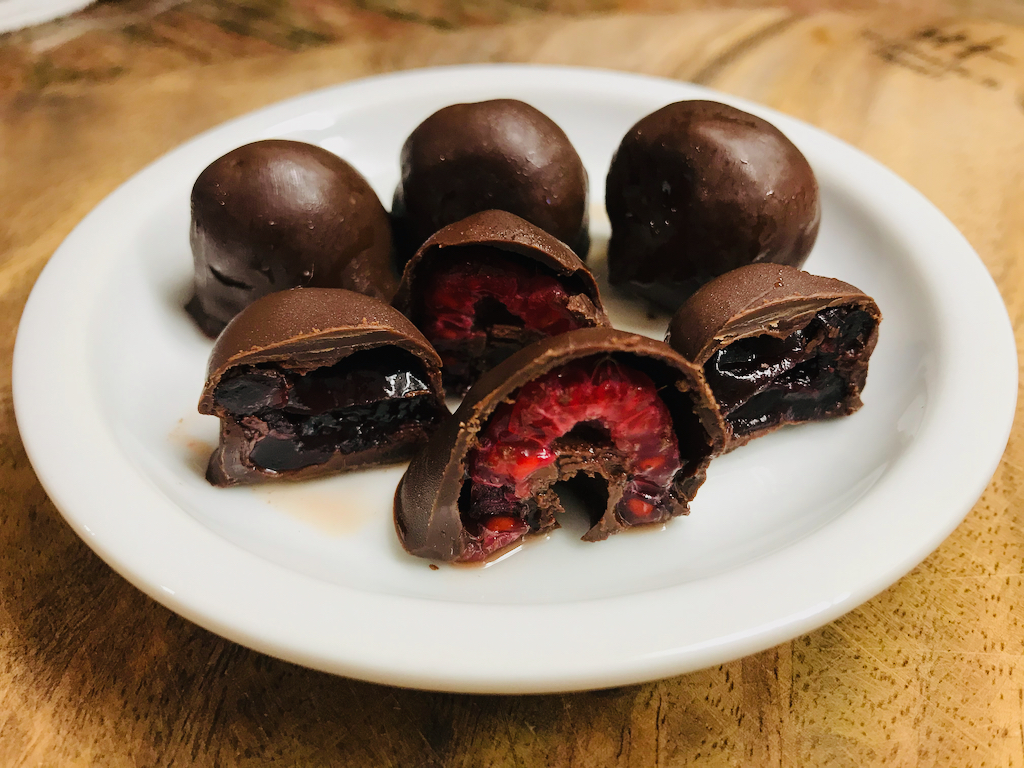
After the chocolate has set you can transfer the finished chocolates to a glass dish with a lid for easy storage until ready to pack up and give away. They’re best when given a couple days to rest and let the candy coating liquefy and meld with the berry inside. You get that deep dark chocolate, then sweet filling, then tart raspberry or smokey cherry in the center. It really runs the gambit of lovely flavors, all in a couple bites.

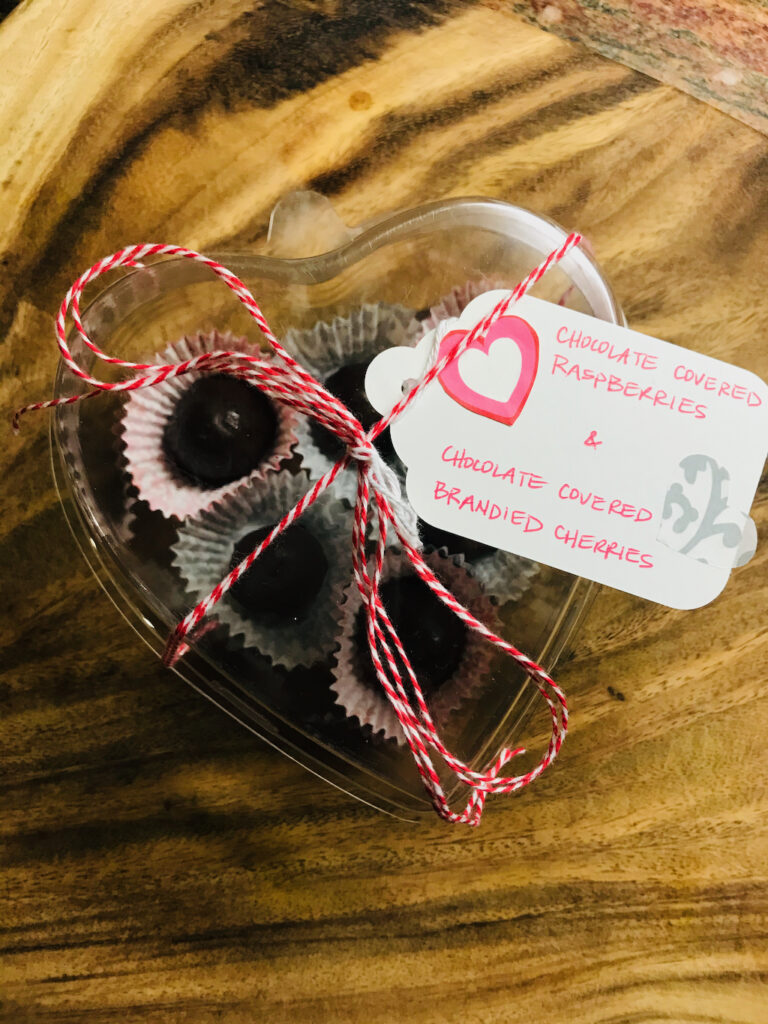
Enjoy, my lovelies!
–Becky
Download the Chocolate Covered Raspberry recipe file here.
Download the Chocolate Covered Brandied Cherry recipe file here.