Mousse Trifecta

The Standard of Classic Dark Chocolate, just a little Grand Marnier Chocolate, & Blood Orange
Jump to the Blood Orange Mousse recipe here.
A trifecta is a prediction of three wins or grand events. These three mousse recipes I am about to share with you are decidedly that: they are both three wins AND three grand events, and I predict that any one of these will be one of the best things you’ll make this year.


They have blood oranges at my local City Market this week, and I love citrus, of any kind. Citrus runs the gambit of the most of any taste for me: the sourest, the most bitter, the sweetest, and if you’re like me and hardily salt your grapefruit sometimes, then it can also complete the gambit by being the saltiest as well.


I also love meringue and gelatin, in most any forms.
I definitely had my heart set on making something delightful and special with these blood oranges and with Valentine’s Day coming up, I wanted to post something elegant and light.
I settled on blood orange mousse.
Now, I’ve never actually made mousse; even more scandalous, my daughter didn’t know what it was! (Stay calm; she does now, and she’s on the mousse bandwagon; she might be the lead singer on the mousse bandwagon, so that’s been rectified.) She did however, call it egg pudding, but Kevin started that and she really loves being a mini Kevin, so I can’t hold her calling it egg pudding against her too stringently.
After looking into mousses, I just couldn’t tear myself away from wanting to make a nice, classic dark chocolate mousse, but most chocolate mousse recipes, and I mean a lot of them, also include coffee or liqueur to make the chocolate really stand out. So now I wanted to do something with this in-season citrus, and a classic chocolate mousse, and also try out one of these chocolate liqueur mousse recipes.
So I did all three!


I of course started my mousse recipe search in The Joy of Cooking, then referenced “The Book” (The Fundamental Techniques of Classic Pastry Arts) and then found a couple recipes that I could use to break down the amount that these recipes make. (I don’t need 30 liters of chocolate mousse, especially if I’m making 3 types.) I found a really helpful mousse tutorial on the YouTube channel by Alain Desgranges which advertises his DVD series, French Apprentice. In the video I found, not only does he give the quantities per person for classic chocolate mousse (which is so helpful), he also has a French accent, wears a chef’s smock, and says that the recipe he shares is his mother’s mousse recipe. I’m sold! A customizable, French mamma’s, classic, chocolate mousse recipe – that is not too sweet, I have to add!
Now this is a very classic chocolate mousse recipe, meaning it does use minimally cooked egg yolks and completely raw egg whites. (I actually cooked my yolks more than Alain Desgranes, because I leave the chocolate over the simmering water when I add the yolks; he removes from the heat together and just whisks the yolks on in.) As it stands, the yolks are barely cooked by just-simmering cream, and the whites are not cooked at all but just beaten with sugar, which as we know does not kill bacteria. Out of curiosity, I looked into this a little.
I know I’ve eaten raw eggs before (even though I’ve always done a double-take whenever I notice no cooking time in the recipe; I reread it just to make sure, every time): hollandaise uses raw egg yolks, Caesar dressing uses raw egg yolks, and mayonnaise: that’s raw eggs too. Come to find out, I eat raw eggs from time to time. (For the life of me, I do not know why Rocky Balboa didn’t just make 6 servings of classic chocolate mousse every morning. He really missed the mark on that one.)
Get ready for an unromantic interlude to a very romantic dessert.
I know I am not a restaurant and I don’t offer anything for sale, but I do feel that since I am venturing to offer advice on cooking, I feel I should post the following consumer advisory:
Consuming raw or undercooked meats, poultry, seafood, shellfish, or eggs may increase your risk of foodborne illness, especially if you have certain medical conditions.
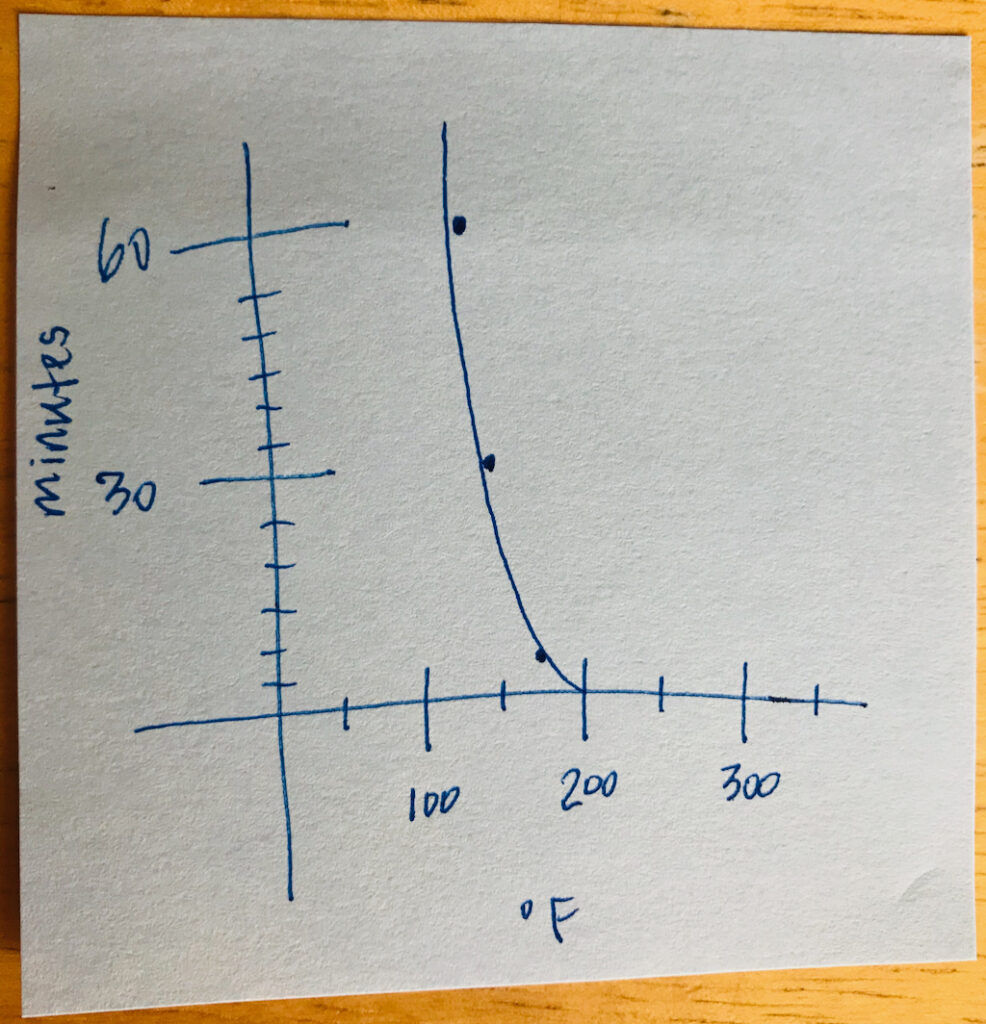
You can find any number of charts and data on proper, safe egg cooking temperatures, most of which range between 144˚ and 160˚F, but none of those charts explain why that’s the magical, safe temperature, in case you find you suddenly need to know if your eggs will reach that temperature in mere seconds of cooking time.
Microorganisms are killed by specific combinations of heat level and time. Salmonella, the most common bacteria found on unpasteurized eggs (or on eggs stored between 40˚F and 140˚F for more than 2 hours) is killed by heating to 131˚F for 1 hour, 140˚F for 30 minutes, and 167˚F for 10 minutes, according to an article on the spruce Eats. Even after scouring fda.gov and eggsafety.org, I wasn’t able to find any specific charts of timeframes for killing Salmonella at higher temperatures that I would more typically use when cooking eggs: when I fry them on medium-low (about 250˚F for about 1-2 minutes), poach them (in barely simmering water, which is about 195˚-200˚F for my altitude, for 3 minutes) or cook them in dishes such as quiche (350˚F for 45-50 minutes) (That one, quiche, is über safe; I’m not in the least bit worried about that one for anyone’s health conditions.)
I drew a chart of the temperatures and times that I did find, to see at what point I feel a very short cooking time would be sufficient, and it looks like you’re pretty safe at 200˚F for cooking times under 2 minutes. (Since cream simmers at 180˚-190˚F, when you make this mousse, if you’re concerned, definitely whisk the beaten yolks into the chocolate and with the cream while the bowl of melted chocolate remains over the pot of simmering water, and try to whisk them for 3 minutes.)
I also found an article on methods of killing bacteria and microorganisms using common household methods on foodsafetynews.com. Riveting, I know. The most useful article I found stated that undiluted white vinegar will kill salmonella, with agitation, after 60 seconds!
This is really useful to me for a few reasons. I have always heard that you should clean your mixing bowl and whisk attachment with white vinegar to ensure that egg whites will whip properly, especially if you need stiff peaks. I’ve always read that it’s because it cuts through any residual fats or greases that may be in the pores of the bowl and attachment, and that those fats inhibit the egg whites’ whipping. I’ve also heard that fresh eggs whip better that old eggs (even though classic French macaron recipes often have you age the egg whites for a few days to reduce the water content and therefore strengthen the final meringue.) Could it be though, that maybe it’s bacteria that weakens the proteins of egg whites and causes them to not whip so well? And that’s why a good, 60-second, wipe-down with white vinegar does the trick so well? I can’t wait until the pandemic is over and we can get back to studying the things that really matter, like the science behind perfect and efficient meringue!
Anyway! Here is my takeaway on my week-long egg-safety pursuit. If you have any underlying medical conditions, but the pictures in my post thus far have absolutely sold you and you MUST MAKE MOUSSE, consult your doctor, and follow these steps along with the recipe:
Wipe your eggs down with white vinegar for 60 seconds before and after bringing them to room temperature (so immediately after removing them from the fridge and then again right before you crack them). As always, wipe down the bowl of your mixer and whisk attachment, but be sure to wipe down all parts for 60 seconds. Then, wipe down any bowls or ramekins you’ll use when separating your eggs. When separating your eggs, be sure to wash your hands thoroughly, and if you’re really serious, wipe your hands down with some vinegar too. Then use your eggs within two hours. (Ideally, you don’t want to crack and separate your eggs until you’re ready to use them, but I just felt I needed to say it.)
As for the yolks, when making these chocolate mousses, you’ll whisk them by themselves first and then whisk them for about 3 minutes in some just barely simmering cream (that cream is about 180˚-190˚F for most altitudes, which is right on the cusp, so you may want to whisk that together still over the pot of simmering water to have a better chance of maintaining that temperature for the full 3 minutes.)
As for the whites, they’re simply not cooked, so clean those shells and all the utensils, and you’ve got a great chance of being able to enjoy this magical dessert while being safe.
Now, let’s get to the good part!
Mousse Trifecta
#1. The Standard of Classic Dark Chocolate Mousses
You’ll Need:
(Recipe quantities are for 2 servings, but you can easily halve it for one, or multiply it for more.)
(The easiest quantities to work with are for 4; any more than 6 portions most likely won’t fit in your home mixing bowl.)
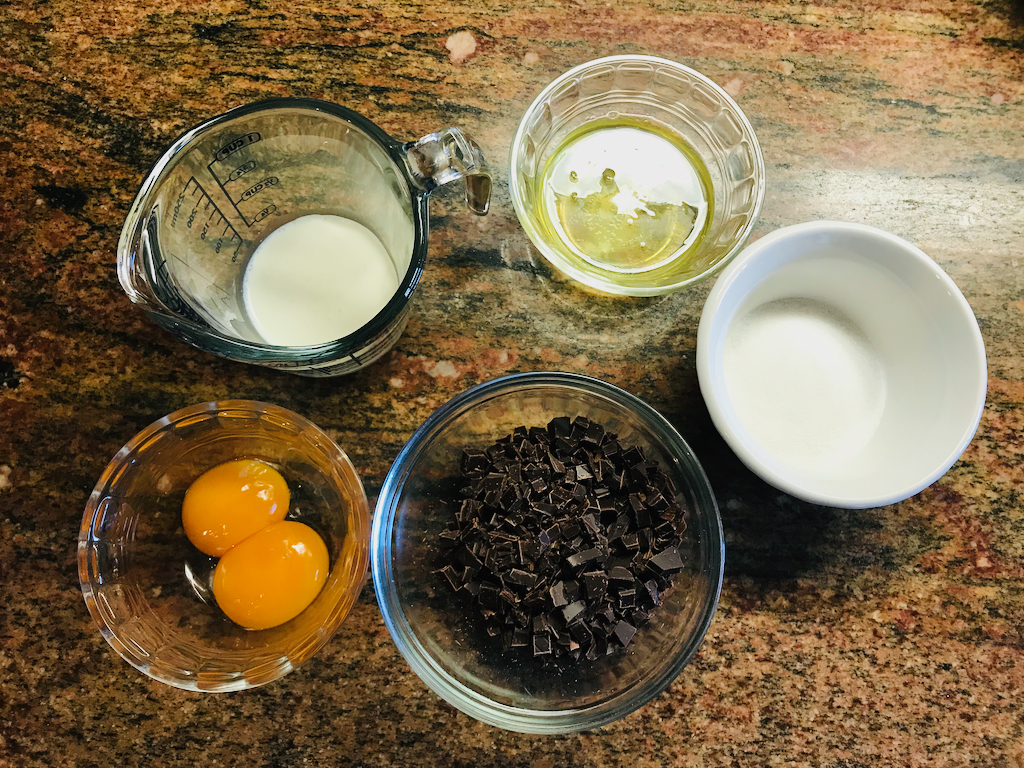
- 60g (3 oz) good quality dark chocolate, 70% cocoa mass
- 30g (2 Tbs) heavy whipping cream
- 2 eggs, (cleaned) separated, and at room temperature
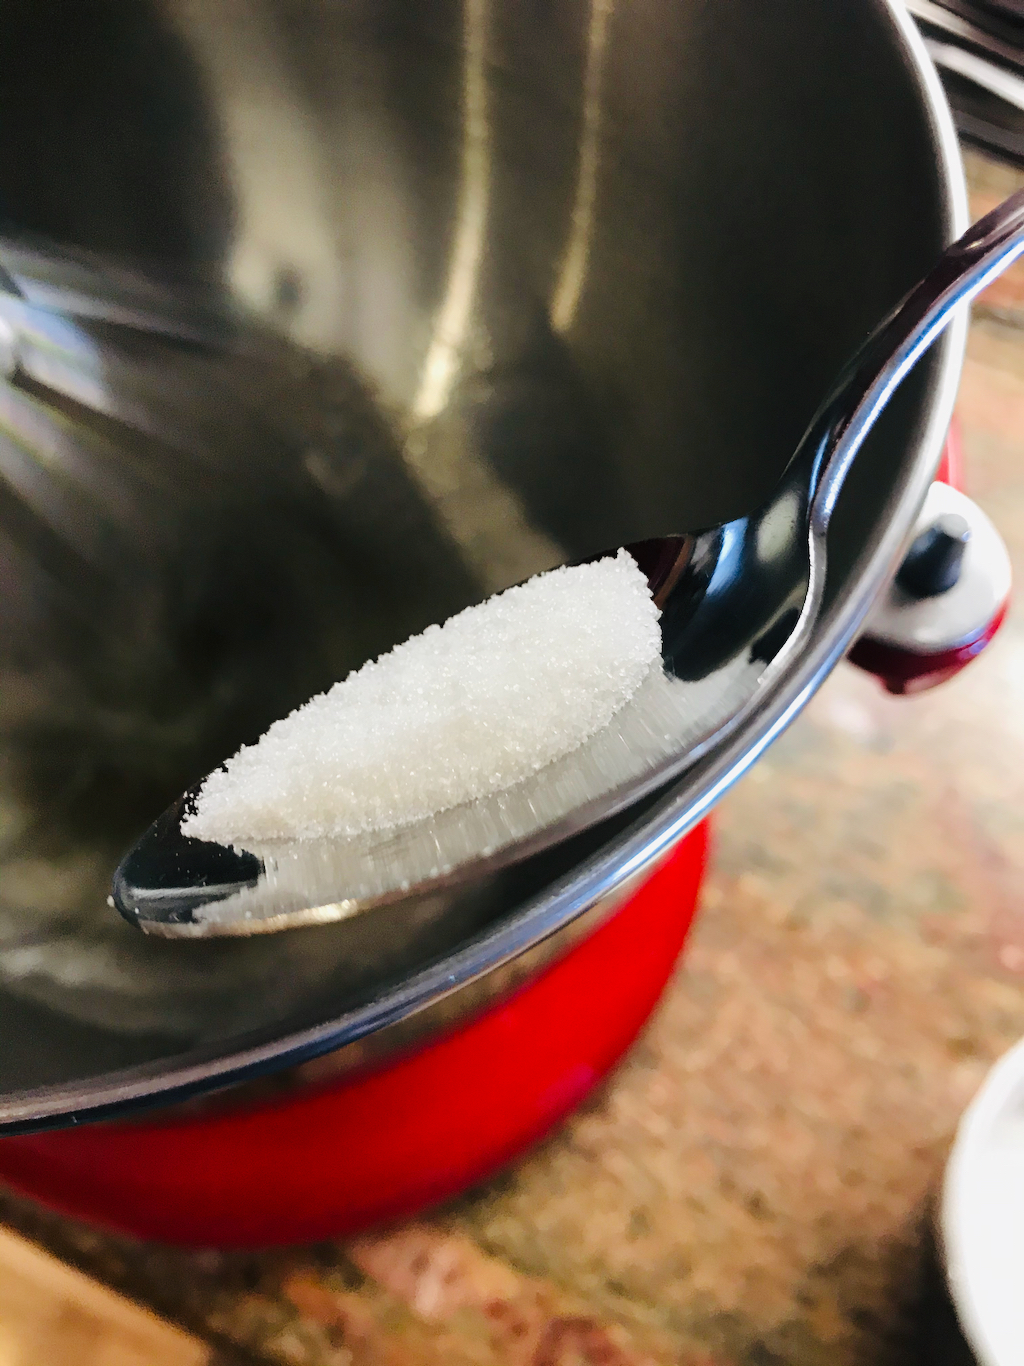
- 20g (4 ½ tsp) granulated sugar
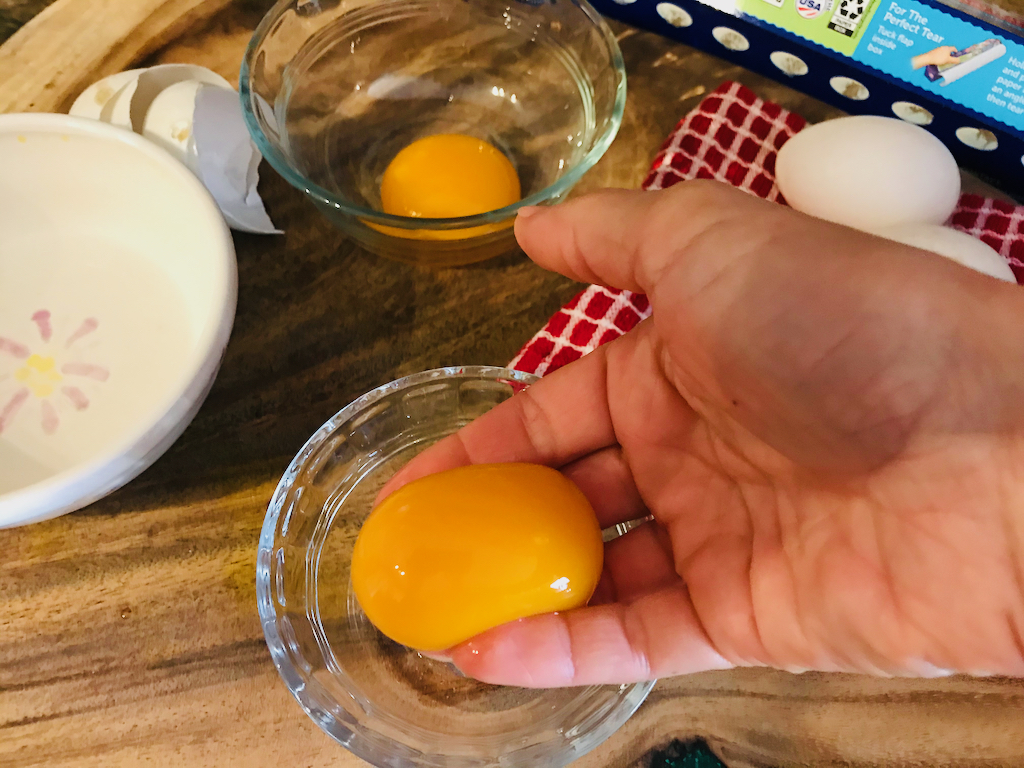
Clean all of your utensils and bowls and the whisk attachment of your stand mixer with white vinegar for at least 60 seconds. (And clean your eggs if you feel you’d like to.) Then start by separating your eggs.

In the bowl of a stand mixer, start beating your 2 egg whites on low until slightly foamy.


In a medium-size saucepan filled with an inch or two of water (or in the bottom pot of a double boiler) start the water boiling. Bring to a boil, then immediately reduce to a simmer.


Chop your 60g dark chocolate into small and even pieces (to help it melt evenly.)

Once your egg whites in your mixer are foamy, increase the mixer’s speed to high add 1 tsp of sugar. Add additional sugar just a teaspoon at a time and only once the previous teaspoon of sugar has been completely dissolved.


Once your pot of water has boiled and reduced to a simmer, place your chopped chocolate in a bowl that will fit the top of the pot and will also not touch the water level (or, of course, place the chopped chocolate in the top pan of a double boiler) and make sure your water is at a gentle simmer, and place the bowl atop the pot. Allow your chocolate to melt slowly. Let it take as much time as it needs to melt. (If you try to speed up the melting of the chocolate, you will cook it and change its structure, making it grainier and your final mousse will be flat and runny.) You can also cover the chocolate with a dish towel to get a slow even melting.


By now, you’ve Kept adding your 20g of sugar a teaspoon at a time to your egg whites. Once all of the sugar has been incorporated, allow the whites to whip to very stiff peaks, almost to the point that the meringue tends to cling to the inside of the whisk attachment.


Start your 30g of cream simmering in a very small pot. (This is not much cream at all, so it will come to a simmer pretty quickly, so be sure to watch it.)


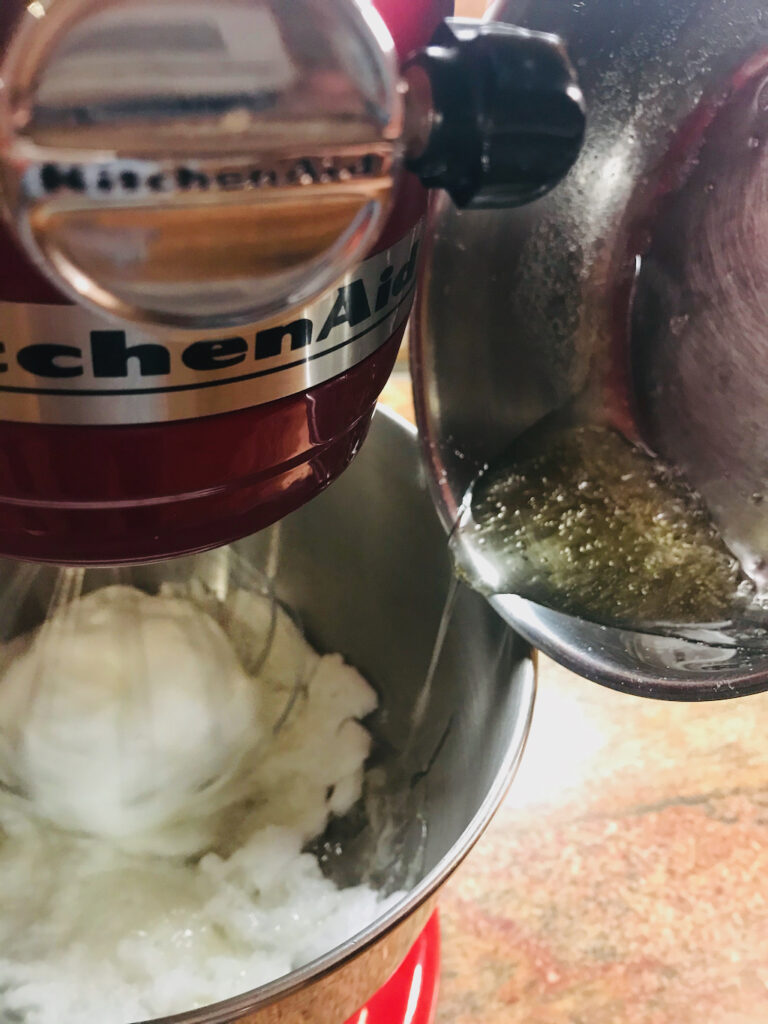
Once your chocolate has completely melted, is silky smooth, runny and shiny, in a small, cleaned bowl, whisk your egg yolks vigorously and briefly, then add the barely simmering cream and the beaten egg yolks to the melted chocolate. Having just beaten the egg yolks should help them to not curdle in the hot cream and warm chocolate. Stir or beat the chocolate-cream-yolk mixture until very smooth, for about 3 minutes.


Remove from the heat, and once your egg whites have reached very stiff peaks, add one large spatula scoop of meringue and fold in more vigorously than you will the rest of the meringue. Once that first scoop of meringue is added fully, add the meringue in 2 or 3 more additions, folding very properly and gently, lifting the contents from the bottom of the center of the bowl to the outside of the bowl, then rotating the bowl about 1/8th of a turn and repeating.


Continue gently folding in the rest of the meringue until you’ve got mousse! (I have been told that it’s better to leave a tiny streak or two of unincorporated meringue than it is to overmix your mousse, because overmixing can cause your mousse to become flat and runny, so try not to overmix.)


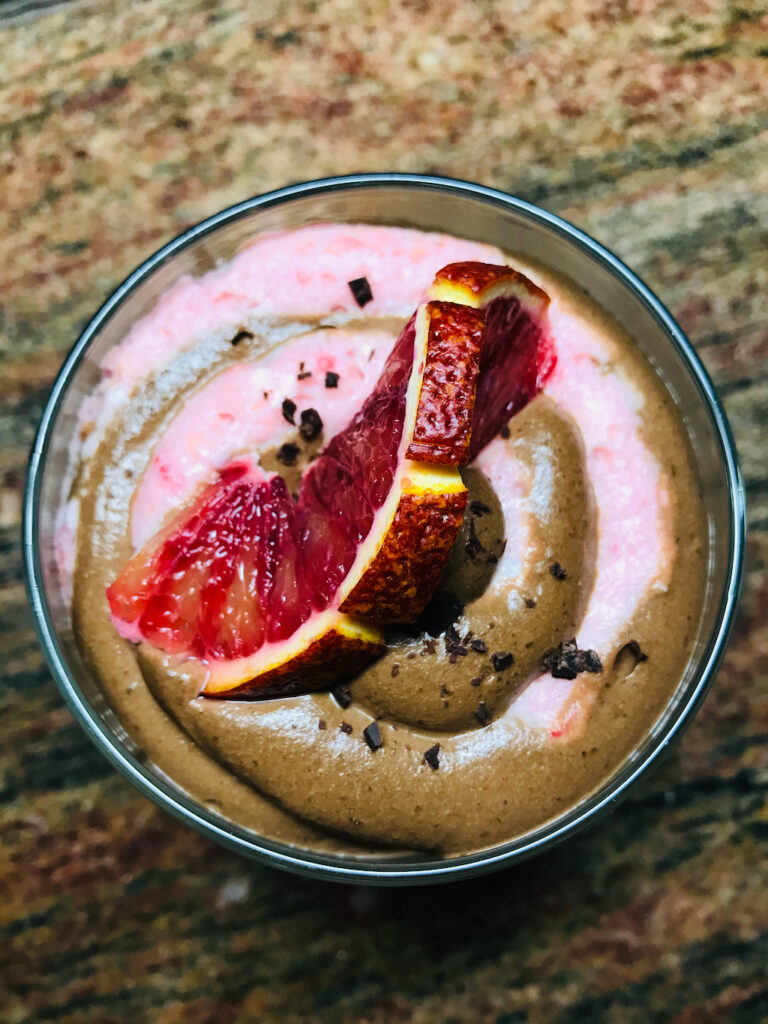
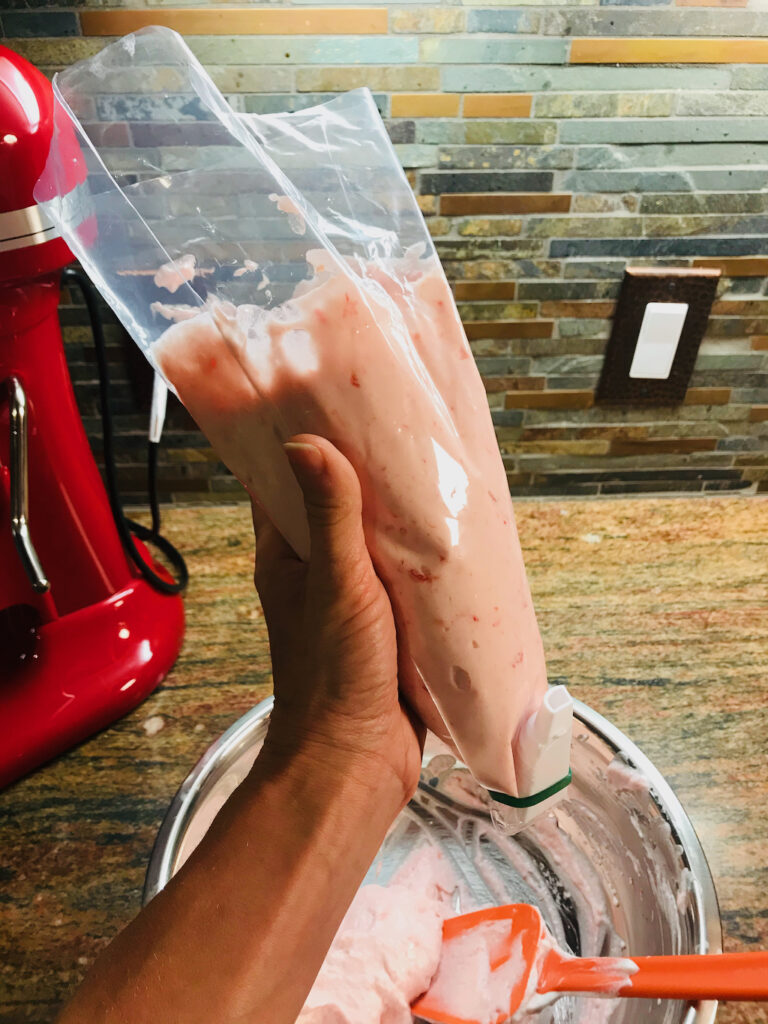
I like to store jams and fillings and similar things in piping bags with a rubber band on top and a binder clip on the bottom, no piping tip, just the end of the bag snipped, rolled up and clipped. That way my jam is ready to fill macarons or Linzer cookies, or whatever, at a moment’s notice. I decided to put my mousse directly in piping bags as well. That way I could pipe a pretty swirl of all three mousse favors together into one dish.


Once your mousse is mixed, you can transfer it directly into serving dishes or into piping bags or whatever dish you’d like to store it in. I have read, and I have personally experienced, that it lasts in the refrigerator for up to 4 days.


That Classic Chocolate Mousse recipe, that I am calling the Standard of Classic Dark Chocolate Mousses, is my favorite of the three. My next favorite is the Blood Orange Mousse. (It’s very hard to choose a favorite though, it’s definitely a Sophie’s Choice situation.
But before we get to that Blood Orange Mousse, let me tell you how to make #3. just a little Grand Marnier Chocolate Mousse :
(or any liquor-infused mousse): use the exact same recipe and techniques for the Classic Dark Chocolate Mousse, but simply whisk in 1 tablespoon of Grand Marnier (or liquor of choice) into the simmered cream (just before you whisk in the egg yolks and mix all into the melted chocolate before folding the ganache into the meringue).


I however, made one, unnecessary but delightful, addition to my Grand Marnier Chocolate Mousse: the Blood Orange Mousse recipe that I made second only calls for egg whites, so rather than tossing (or trying to freeze) the yolks, those little golden nuggets, I put them in the Grand Marnier Mousse! It was a little stroke of genius, though I do say it myself. The result was akin to eating smokey orange chocolate butter, if you like that sort of thing.


Here goes my second favorite of all my favorites:
#2. Blood Orange Mousse
You’ll Need:
(For 2 servings, but again, you can easily halve for one or multiply for more)
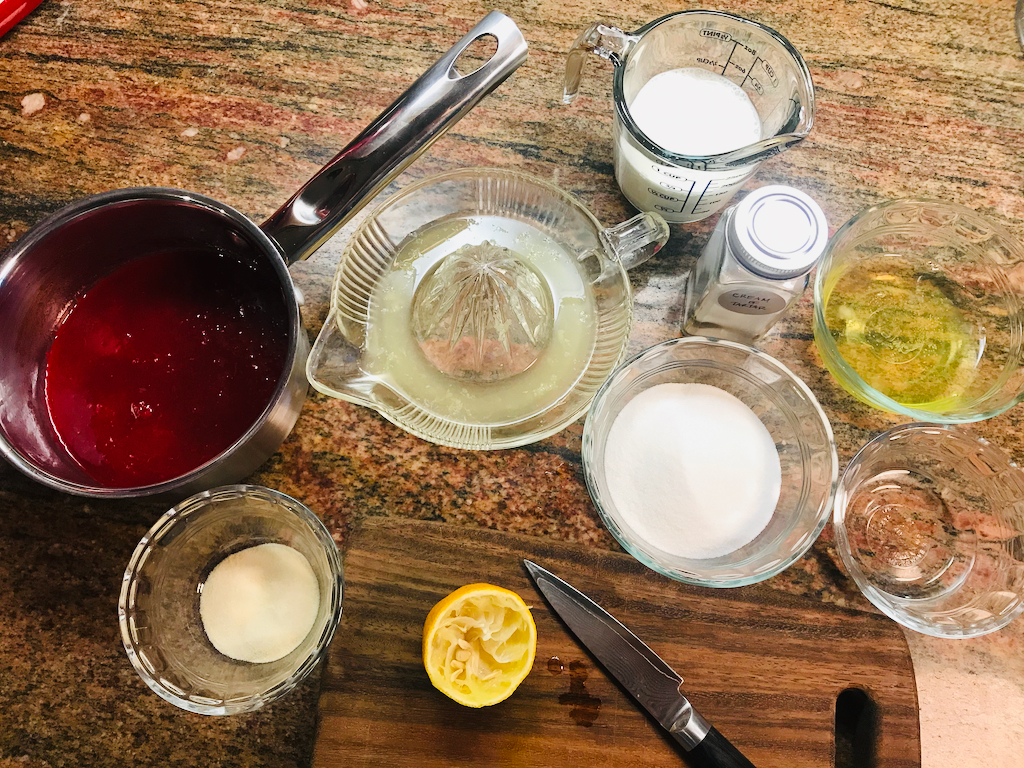
- The juice from 4 blood oranges, about 300ml (or 1 ¼ cup)
- 6.5g (2 tsp) powdered gelatin
- The juice of ½ lemon
- 100g (1/2 cup) granulated sugar
- 33 ml (1.12 fl oz) water
- 2 egg whites
- I pinch of cream of tartar
- 133 ml (about ½ cup) heavy whipping cream, whipped to firm peaks
If you’d like to really make sure your eggs are clean, wipe down your 2 eggs with white vinegar before and after bringing them to room temperature. Wipe down the bowl and whisk attachment of a stand mixer as well as any bowls or ramekins you’ll use when cracking and separating your eggs.
Start by whipping your 133 ml (about ½ cup) of heavy whipping cream to firm peaks; just don’t let it become butter. (Public Service Announcement: if you do ever bring your whipped cream too far, just add in more whipping cream. According to yet another really great article by Helen S. Fletcher of Pastries Like a Pro, add one fourth to one third the amount of cream you started with, as a general rule. Adding the cream in at a very low speed then bringing it back up to a higher speed for just a few seconds the consistency you were after.)


If you use your stand mixer to whip the cream, wash the bowl and whisk attachment well, then wipe it down with white vinegar, for so many reasons discussed in this epic blog post.
Now it’s time to juice your 4 blood oranges. You’re going to reduce the juice down to 3.5 oz. The best way I’ve found to do this came from a lime-juice-flavored marshmallow recipe of all places. To know when you’ve reduced your juice down enough, measure 3.5 fluid ounces of water into a saucepan, place the handle of a wooden spoon in the water and mark the water level on the spoon handle (a wooden skewer or coffee stirrer would also work). Pour out the water, then pour in your approximately 300 ml of blood orange juice and cook on medium heat, stirring occasionally once it comes to a simmer. Allow it to reduce down, stirring occasionally until when you put the spoon handle in the juice, it reaches the line on the handle. (This took me about 24 minutes.)


(At this point you can strain the pulp out of your juice concentrate if you’d like a fully smooth, velvety texture to your mousse. I left my pulp in, because I actually like pulp in my orange juice, but Kevin doesn’t, so I haven’t had pulp in orange juice in years! (Plus straining is one extra step – even though I’m already making a mousse trifecta.) Either way, you can’t go wrong; strained or not strained, this mousse is tangy, smooth, light, sweet, lightly sweet, and melts in your mouth leaving the slightest citrus zing.)
Allow the juice to cool for a few minutes or to a temperature of 212˚F or lower before adding the 6.5g powdered gelatin. Then add the lemon juice and stir everything together very well.


Now go ahead and separate your eggs.

Next whip your egg whites on low speed until they become slightly foamy.


Place your 100g sugar and 1.12 fl of water into a saucepan and stir the sugar to dissolve. Over medium heat, bring the sugar syrup to a boil and cook to 250˚F. (This takes about 7 to 10 minutes.)


In the meantime, add the pinch of cream of tartar to your egg whites and increase the speed to high and beat until stiff peaks form.
Once your syrup has reached 250˚F, remove it from the heat, and allow it to cool to 212˚F (this cooling to 212˚F is to protect the proteins in the gelatin. For a really informative article on gelatin, its uses, and its top pitfalls, check out this article by Stella Parks at Serious Eats.)
As soon as your syrup has cooled to 212˚F, reduce the mixer speed to low and slowly pour in the sugar syrup down the side of the bowl, being sure not to pour it on the whisk.


Beat the egg whites, which is now officially meringue, until room temperature. This generally takes about 8 to 10 minutes.
Now fold one spatula’s worth of meringue into your blood orange juice mixture and fold it in slightly more vigorously than you will the remainder of the meringue.


Fold in the rest of your meringue in 2 or 3 more additions. Folding by bringing the contents from the bottom of the middle of the bowl to the outside, then rotating the bowl 1/8 of a turn and repeating.


Next fold in the whipped cream, all at once, but still gently fold, until incorporated.


Transfer to a piping bag or serving dishes or storage dishes, whatever your fancy, and refrigerate for 3 hours.
It will keep in the refrigerator for up to 4 days, and I find it keeps really well, tightly wrapped in a piping bag.
Now that you’ve got your Mousse Trifecta, it’s time to decide how you’d like to dish them up.
I have a piping coupler that I’d never used before now (I just bought it for the mega tip it has), and I decided to give it a try. It takes 3 separate piping bags and pushes the tips all through one large tip, giving you three swirls in one. Though I did use the disposable piping bags that came with it, I still needed to tape the bags to the coupler, so I’m not fully recommending it. It did give a nice look, and I like all 3 mousses striped together. Every bite has that deep, simple, not-to-sweet Classic Dark Chocolate Mousse, then you get the smoky citrus of the Grand Marnier Chocolate Mousse, then that tangy bright smooth Blood Orange Mousse cleans your palette and you’re ready for another bite.


The swirly-swirl is the most elegant. I did however, just really, really love the Classic Dark Chocolate Mousse, and so I did want a bit of that just on its own, so I decided my favorite way to serve my Mousse Trifecta, is Neapolitan style. Pipe a stripe of each in a dish, side by side. That way, you can eat each by itself or swipe your spoon across all three, then switch back to any single flavor at will.


Of course, you’ve still got each flavor in its piping bag, so you can dish up just one of any flavor into its own dish for whomever would like their favorite all on its own.


So much mousse, so many options!
Enjoy!
—Becky
Download the Blood Orange Mousse recipe here.